Building a dbt Pipeline to Join Multiple Data Sources
tl;dr> In this post, you'll learn how to set up a dbt pipeline that integrates federated data--treating data from multiple data sources as though they were one--and support query federation that joins across these data sources.
Check out the video for a summary, and follow along below for an in-depth walkthrough.
Build a dbt Pipeline with Query Federation
If you want to interact with data from multiple sources in dbt, you have a few options. You can move all of the data to a single place like Snowflake or BigQuery and things get a lot easier--but you have to configure additional tooling to do this, and then ensure that the data you move is continually moved so that it is up-to-date, both of which can add effort and complexity to your pipeline. You could also use something like Trino, which enables you to connect to multiple data sources without needing to configure those data extraction steps, but due to the way that Trino functions, it can still be quite laborious and complex to set up, debug, and maintain.
In this post, we'll show you how to build a dbt pipeline that uses federated queries, and that is also quick and easy to set-up, using GlareDB Cloud. In fact, if you want to jump right in, you can clone this sample dbt pipeline repo, add your GlareDB credentials, and run the pipeline without any additional configuration.
By using dbt together with GlareDB Cloud you can build a data transformation pipeline that incorporates data from many different sources (Snowflake! BigQuery! Postgres! Parquet on S3! Excel uploaded to GlareDB Cloud!), without needing to configure external data extraction or loading tools, and without needing to set up additional infrastructure.
As a reminder, you can sign up for GlareDB Cloud here, and there's a substantial free tier to get started.
Note: This post assumes that you know the fundamentals of dbt. If you
haven't used dbt previously, I recommend first checking out a dbt tutorial
to get the fundamentals. Though we don't go into it in this post, you'll also
want to make sure that you're keeping a tidy properties.yml file to describe
your sources and models. This is generally good practice for dbt projects, and
is especially important here since your models can join data from so many
different data sources and in so many different ways.
But first, some context: I spent the first few years of my career as a data analyst, first working with Excel and R, and then with SQL and Python. When I discovered and started using dbt, I was really excited: with dbt I could write models once and just re-run a pipeline instead of running the same queries over and over again each month. And it meant that I could rely on version control, dbt documentation, and dbt tests, instead of untangling messes of SQL to understand a pipeline and its history.
And dbt delivered on what it promised. It was...dare I say, fun? to use, and it was so satisfying to collaborate with colleagues, writing and documenting dbt models and slowly watching our dbt DAG expand, unfold, and get denser and more detailed.
But one thing surprised me. I had a project with data in a few different data sources - I remember we had a couple of different Postgres instances, data stored in Google Cloud buckets, and some of the team was also trying to use BigQuery as well. And I was surprised that dbt couldn't reckon with this, and that I would now need to use another tool to move the data around, and ensure that all of the data in different places were kept up-to-date. While the work I was doing wasn't all interesting, creative analysis (there was always a lot of data wrangling and cleaning), the data were always a central part of the experience, and it was somewhat jarring to need to step away from the data to configure the data loading infrastructure.
In principle, I get it: dbt was focused on doing a job and doing it really well. That job was transformation, and not extraction or loading. But while the process of going from ad hoc analysis to building a dbt pipeline had been so smooth, since both let me stay so close to the data, I found the need to configure these additional tools to be rough and jarring. This is why I am so excited to show you how, with GlareDB and dbt, you can just stay close to the data, rather than spending time and energy configuring infrastructure.
Set-Up
GlareDB is a database that functions as a single pane of glass - it treats all of your data as if they were SQL-addressable, and as if they were all in the same place. This means that if you use GlareDB as your destination warehouse, you can write dbt models that pull from data in a wide variety of locations without needing to move your data around in a separate step.
Let's try it out!
First, sign up for GlareDB Cloud if you haven't already (there's a free tier. In order to use dbt with GlareDB as a destination database, you'll need GlareDB Cloud - we'll explain this more in a bit. Once you've signed up, you can create the table used for this tutorial by going to the GlareDB SQL workspace and running:
CREATE TABLE IF NOT EXISTS dbt_nyc_sales
AS
SELECT * FROM
read_parquet('https://github.com/GlareDB/tutorial_data/raw/main/nyc_sales/sale_year=2019/sale_month=1/f55363e2587849bcb25c057be706c69d-0.parquet')
Once you've done that, you'll want to install dbt and the Postgres adapter by running the following from your system shell (I recommend setting up a virtual environment first).
pip install dbt-postgres
Then, you can initialize a new dbt project by running:
dbt init my_glaredb_project
This will create a new dbt directory with everything you need to get started.
Adding Your dbt Credentials and Sources
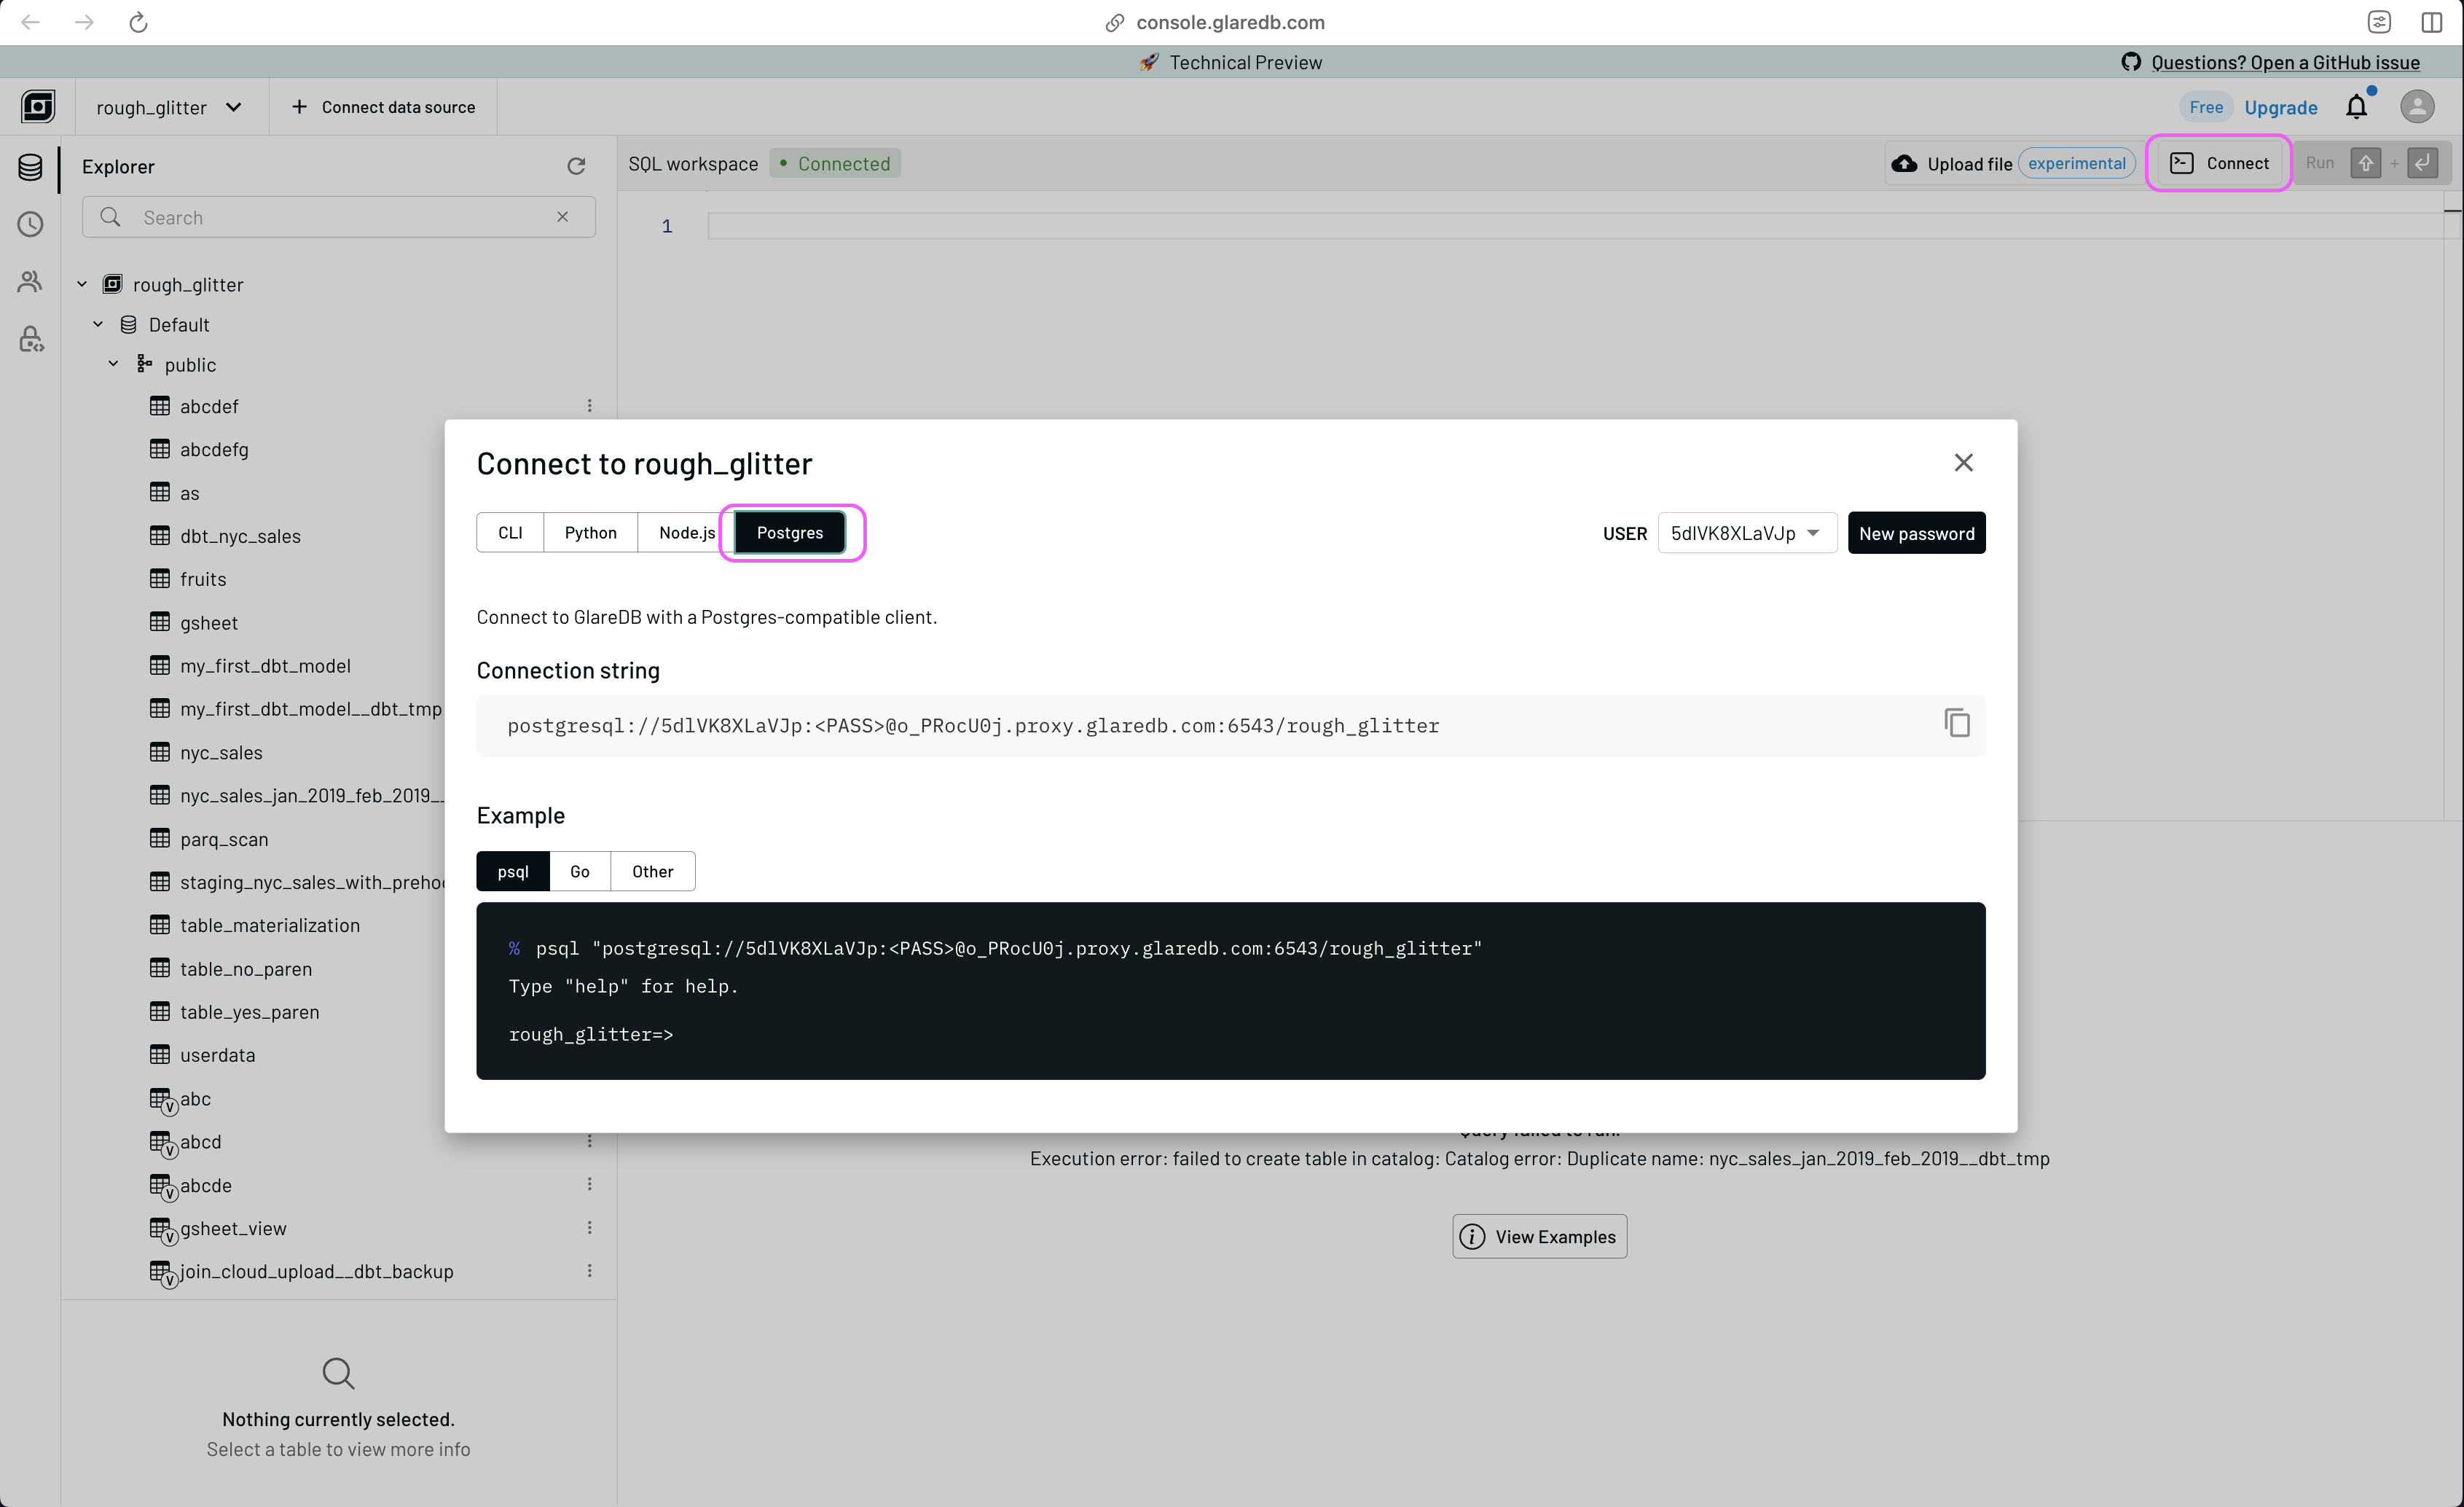
GlareDB is able to work with the Postgres protocol. This means that instead of needing a designated GlareDB adapter for dbt, you can instead connect to GlareDB using dbt's Postgres adapter. To do this, you will need to get a Postgres connection string to use with GlareDB Cloud. Your Postgres connection string can be found in the Connect modal accessed by clicking the button in the upper right then selecting Postgres. If this is your first time opening this menu, remember to save your password for future use.
With the credentials in the connection string, you can build out the
profiles.yml file that holds your dbt credentials.
Note: When you get your connection string, it will look something like
glaredb://user_name:password@org_name.proxy.glaredb.com:6543/deployment_name.
Due to a quirk with the way this works with dbt Cloud, you should specify your
dbname as org_name/deployment_name, and the host as proxy.glaredb.com.
This will work with both dbt Cloud and dbt Core.
dbt_glaredb_quickstart:
  outputs:
    dev:
      dbname: org_name/deployment_name
      host: proxy.glaredb.com
      pass: password
      port: 6543
      schema: public
      threads: 1
      type: postgres
      user: 2g7nT1ShV4zA
  target: dev
Once you've set this up, you're done configuring credentials with dbt! GlareDB will handle the authentication and connection with your other data sources as needed.
To start, test out your connection by running
dbt debug
from your system shell.
Writing Your First dbt Model
After creating your table and configuring your credentials, you can add your
table as a dbt source, and then create a basic model:
-
In your
models/directory, create a file calledproperties.yml. Into that file, add your newly created table as a source by pasting the following:version: 2 sources: - name: glaredb schema: public database: default tables: - name: dbt_nyc_sales -
Create a new file in your
models/directory calledstaging_dbt_nyc_sales.sql. -
Add the following to
staging_dbt_nyc_sales.sql:SELECT borough, neighborhood, building_class_category, residential_units, commercial_units, total_units, land_square_feet, gross_square_feet, year_built, sale_price, sale_date, latitude, longitude, bin, bbl FROM {{ source('glaredb', 'dbt_nyc_sales') }}
For the sake of brevity in the blog post, we're doing a simple SELECT here. But if you click into the sample repo, you'll see that we follow dbt conventions of using CTEs in staging models.
Combine Data From Your Database with Data on GitHub
If you were already familiar with dbt, writing this staging model may not seem
that exciting. So let's make things more interesting by including another
file hosted on GitHub in our query. In this case, the dbt_nyc_sales table
only has data for a single month - January 2019. Let's use a UNION to add
the February 2019 data as well. As before, you'll first create the model file,
in this case called nyc_sales_jan_2019_feb_2019.sql, with the following
content:
SELECT * FROM {{ ref('staging_dbt_nyc_sales')  }}
UNION
SELECT
    borough,
    neighborhood,
    building_class_category,
    residential_units,
    commercial_units,
    total_units,
    land_square_feet,
    gross_square_feet,
    year_built,
    sale_price,
    sale_date,
    latitude,
    longitude,
    bin,
    bbl
FROM read_parquet('https://github.com/GlareDB/tutorial_data/raw/main/nyc_sales/sale_year=2019/sale_month=2/f55363e2587849bcb25c057be706c69d-0.parquet')
Join Data Between Postgres and GlareDB
Then, you can join data between databases in a single dbt
model. If you take a look at the dbt_nyc_sales table that you created,
you'll see that the borough column uses a foreign key. But where's the lookup
table? It's in Postgres! Luckily, that's no big deal. In a new model called
nyc_sales_with_postgres_lookup.sql, add the following code.
SELECT
    lookup.borough_name,
    sales.land_square_feet,
    sales.gross_square_feet,
    sales.year_built,
    sales.sale_price,
    sales.sale_date,
    sales.latitude,
    sales.longitude,
    sales.bin,
    sales.bbl
FROM {{ ref('nyc_sales_jan_2019_feb_2019') }} sales
JOIN read_postgres('postgres://demo:demo@pg.demo.glaredb.com/postgres', 'public', 'borough_lookup') lookup
ON sales.borough = lookup.borough_id
Adding Postgres as an External Database
As written, nyc_sales_with_postgres_lookup.sql includes the credentials
for accessing the database. This is
convenient when you're just querying one table from an external database, but
if you're using several tables from an external database and don't want to type
your credentials over and over again, you can instead add the data source as an
external database to GlareDB. This will let you access tables from the external
database using dot notation, as in: another_database.schema_name.table_name.
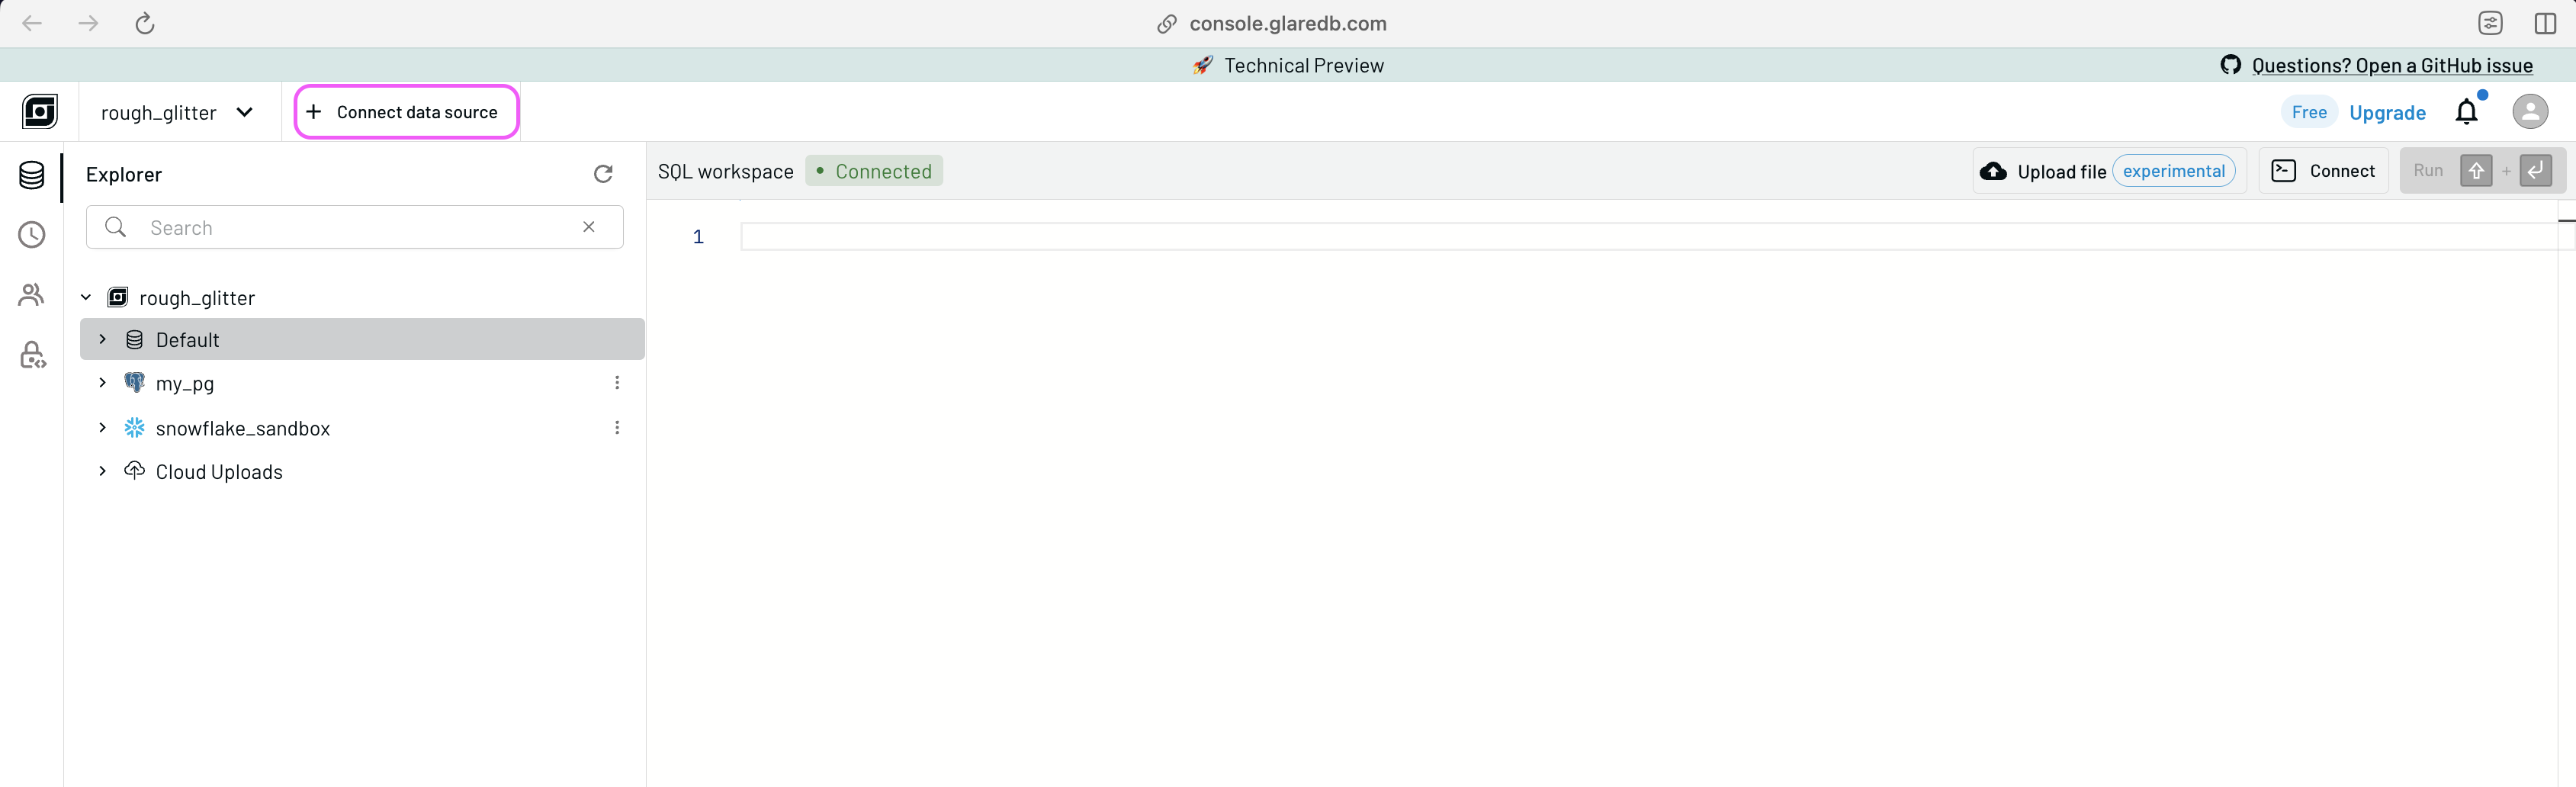
Let's try it now with this Postgres database. In your GlareDB Cloud SQL
workspace, you can click + Connect data source in the top left.
Select Postgres, and follow the instructions in the modal. You can use these credentials for this example:
user: demo
password: demo
host: pg.demo.glaredb.com
port: 5432
database: postgres
Then, GlareDB will test and add the external database.
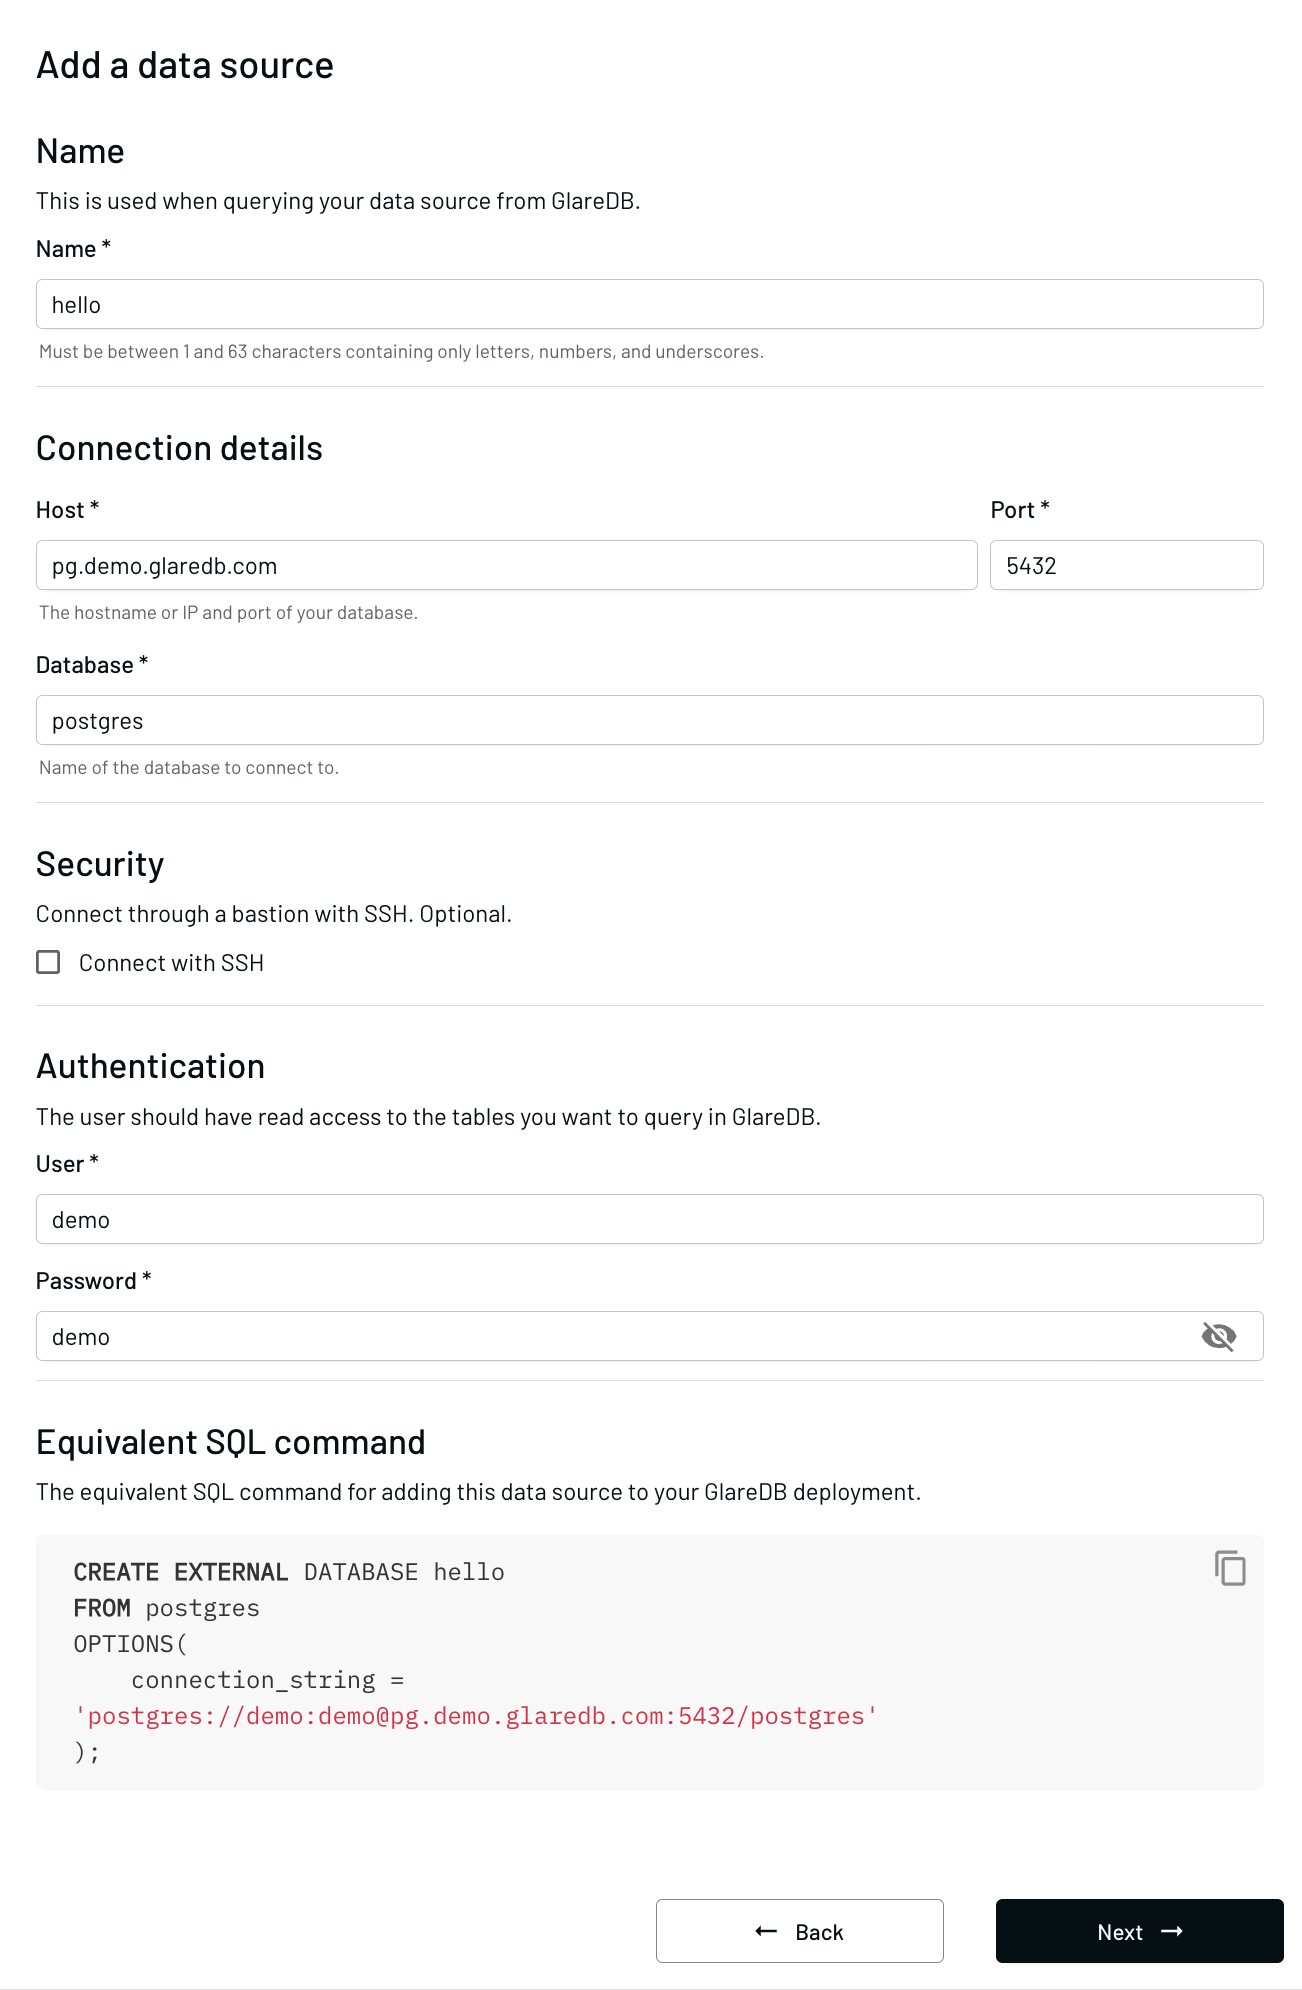
At the bottom of the "+ Connect data source" modal, you'll also see the SQL command used to add this external database if you prefer to use SQL instead of the GUI next time.
CREATE EXTERNAL DATABASE my_postgres
FROM postgres
OPTIONS(
    connection_string = 'postgres://demo:demo@pg.demo.glaredb.com:5432/postgres'
);
Now, let's re-write the dbt model to reference this external database instead of requiring the use of credentials directly in the model.
SELECT
    lookup.borough_name,
    sales.neighborhood,
    sales.building_class_category,
    sales.residential_units,
    sales.commercial_units,
    sales.total_units,
    sales.land_square_feet,
    sales.gross_square_feet,
    sales.year_built,
    sales.sale_price,
    sales.sale_date,
    sales.latitude,
    sales.longitude,
    sales.bin,
    sales.bbl,
FROM {{ ref('nyc_sales_jan_2019_feb_2019') }} sales
JOIN my_postgres.public.borough_lookup lookup
ON sales.borough = lookup.borough_id
In this demo, we're not going to go through a walkthrough of all the different data sources that GlareDB supports, but you'll find sample models for Snowflake, BigQuery, GCP, and S3 in this repo.
Using dbt Pre-Hooks to Set Things Up Before Running Your Pipeline
If you want to make sure that the external database is configured prior to running your pipeline, you can set up a dbt pre-hook. This lets you execute SQL outside your models at various stages of your dbt pipeline. For instance, instead of executing the sequence above to add the Postgres instance outside of dbt, you could add the SQL command to a pre-hook by pasting the following at the top of your model:
{{ config(
    materialized='view',
    pre_hook=[
    "CREATE EXTERNAL DATABASE IF NOT EXISTS my_postgres
    FROM postgres
    OPTIONS(
        connection_string = 'postgresql://demo:demo@pg.demo.glaredb.com:5432/postgres'
    );"
]
) }}
We're going to show two more interesting pieces of functionality unlocked by using dbt with GlareDB Cloud: GlareDB file upload, and COPY TO (which enables file download).
File Upload
With GlareDB Cloud, you can upload files from your local machine and access them like any other tables in your database. To do this, click on the Upload file button shown below.

After selecting and naming your file, you can query it like any other table in your database like this:
SELECT * FROM cloud_upload('myfile.xlsx') LIMIT 10;
This means that you can quickly and easily take files from your machine and
include them in your pipeline without needing to do any complex loading
operations. It's a bit like dbt seed, but in
addition to CSVs it also works with Parquet, XLSX, JSON (line delimited and
multi-line), and BSON; these files can be part of your regular pipeline instead
of being run separately.
COPY TO
GlareDB enables you to take the data from your tables and copy them to object
storage using several different file formats. Maybe you have a co-worker who is
an Excel pro, but not as familiar with SQL. You can add a post-hook to your dbt
model so that once it finishes running, it copies the table to a CSV file in
S3, where you co-worker can download it and peruse it in Excel. To do this, you
could add something like the following to the config block at the top of your
model:
{{ config(
    materialized='view',
    post_hook=[
    "COPY public.my_model_name TO 's3://bucket/my_model_name.csv' FORMAT csv
    CREDENTIALS my_aws_creds ( region '<aws_region>' );;"
]
) }}
Conclusion
There are so many different cool things you can do with GlareDB and dbt together. Check out this repo for references for lots of different kinds of models, including joining across Snowflake, BigQuery, Clickhouse, GCP, and S3, as well as files hosted on GitHub and lots of other places on the Internet.
Have you thought of a cool use-case not mentioned here? Let us know! You can email us at hello@glaredb.com or set up a chat here. Is something not working the way you expect, or is it working so well that you want a new feature? File an issue here!
And as a reminder, you can sign up for Cloud here, and star us on GitHub here.


Get started now
Ready to get the most out of your data? Get started with GlareDB.