Data Quality Across Space and Time
In Join Data Across Space and Time, we learned how to read NYC real estate sales data from several different sources, join them together, and write to GlareDB with a few lines of code. In Dashboards Across Space and Time, we took that data and used Streamlit to build a dashboard to visualize how the locations and sales change over time. In this blog post, we're going to take our NYC real estate sales data from GlareDB Cloud, local files, and Postgres, and join it together with data about the trees in NYC (in Snowflake) to validate some assumptions about the number and variety of trees that are near sold buildings (haven't you faced this question before?!). We'll use Great Expectations to add data quality checks to our query, and demonstrate how to confirm that the data are the way you expect them to be before you load them into your table.
If you haven't already, we recommend signing up for Cloud and going through the previous blog posts - this will help ensure that you've readied your data for the dashboard here. If you're already familiar with setting up and using GlareDB, though, feel free to jump right in!
Installation
Great Expectations (GX) is a library that lets you add data quality checks, called Expectations, to your data. These can be things like expecting your table to have a certain number of rows, or columns, expecting column values to be within a certain range, or expecting that none of the values in a column are NULL. GX can work with data in a variety of formats, and it's quick to get up and running with a Pandas dataframe. If you recall, one of the nice things about GlareDB is that the results of any query can be easily output to a Pandas dataframe, and so with just a few lines of code, it's possible to join data across data sources with a GlareDB query, then validate the results of that query with GX.
If you've worked with Python and Pandas before, the interface will
feel familiar. To get started, make a new directory called glaredb_gx/. Then,
set up a Python virtual environment, and install Great Expectations (and the
Jupyter Notebook library if you don't already have it):
> python3 -m venv venv
> source ./venv/bin/activate
> pip install glaredb great-expectations jupyter
Data Set-Up
In the previous blog posts, we showed how to create a table in GlareDB Cloud from NYC real estate sales data originally from Parquet files (you can clone this repo for the data). Now, we will join that with data from the NYC tree census to establish the number and variety of trees linked to each of the sold properties.
For the purposes of this guide, we'll use the Python bindings so that we can get the results of our queries as a Pandas dataframe. First, we'll import GlareDB and set up a GlareDB connection object:
import glaredb
con = glaredb.connect(<YOUR CLOUD CONNECTION STRING>)
In our case, we have the data from the tree census stored in Snowflake, and so we will next add our Snowflake database to our GlareDB instance as an external database. This will enable us to query and join from our Snowflake database as if the data were right there beside our GlareDB tables.
(If you are interested in following along with this part, you can access the
data in the same repo as above under tree_data/. You can load this in
to your own Snowflake instance, or just query it directly from the CSV!)
con.execute(
    """
        CREATE EXTERNAL DATABASE snowflake_tree_db
          FROM snowflake
          OPTIONS (
            account = 'wy22406.us-central1.gcp',
            username = 'talglaredb',
            password = '<password>',
            database = 'nyc_tree_db',
            warehouse = 'COMPUTE_WH',
            role = '<role>',
          );
    """
)
Once you've set up the connection to Snowflake in GlareDB, you can try querying the data with:
con.execute(
    """
        SELECT * FROM snowflake_tree_db.public.nyc_trees LIMIT 10;
    """
)
Joining with Sales Data
Now you can join your existing sales data in GlareDB with your tree data from Snowflake, and get the data back as a dataframe with:
df = con.sql(
    """
        SELECT nyc_sales."BIN" bin,
                nyc_sales."ADDRESS" address,
                nyc_sales."ZIP CODE" zip_code,
                nyc_sales."SALE DATE" sale_date,
                nyc_sales."SALE PRICE" sale_price,
                COUNT (distinct tree.spc_latin) number_of_tree_species,
                COUNT (tree.spc_latin) number_of_trees
        FROM
        nyc_sales LEFT JOIN snowflake_sandbox.public.nyc_tree_data tree
        ON nyc_sales."BIN" = tree.bin
        GROUP BY nyc_sales."BIN",
                nyc_sales."ADDRESS",
                nyc_sales."ZIP CODE",
                nyc_sales."SALE DATE",
                nyc_sales."SALE PRICE"
    """).to_pandas()
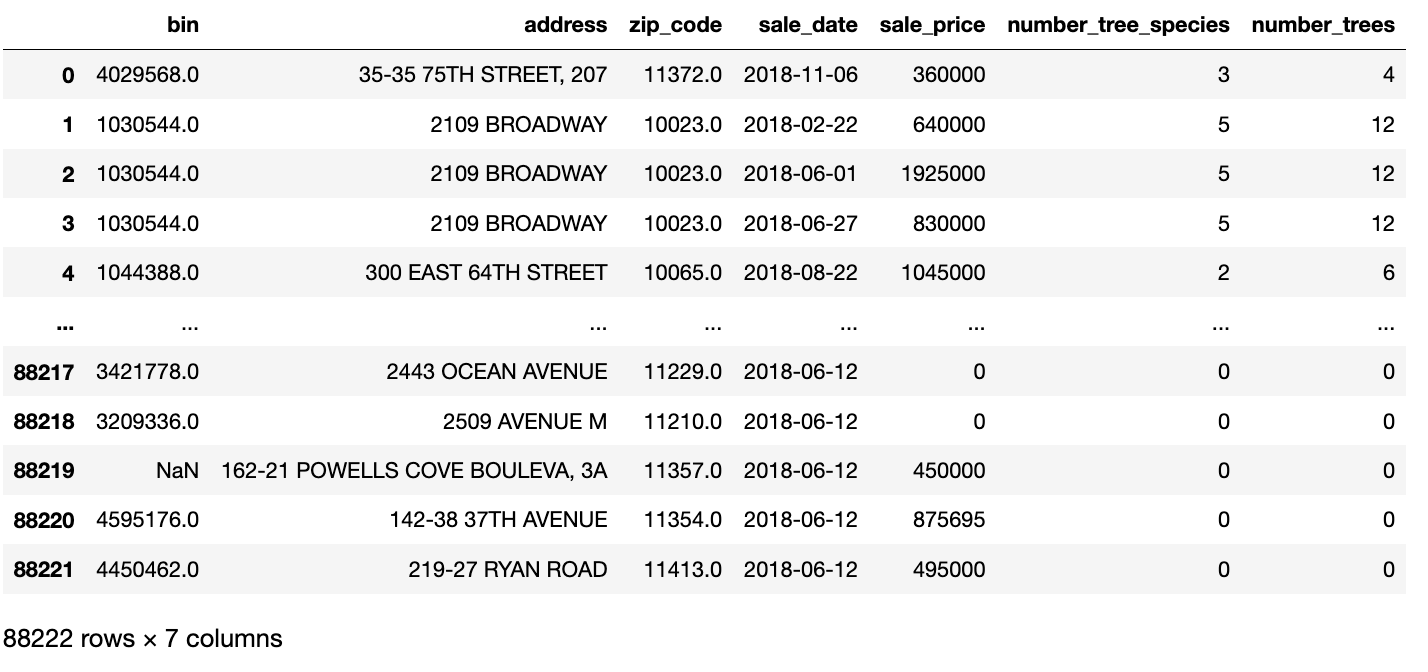
The "BIN" field refers to the "Building Identification Number", which is a
unique field which can be used to join from the sales data to the tree data.
The other fields in the above query are either fields that would be useful to
validate with GX (e.g. number_trees and SALE PRICE) or are fields that can
help us identify any rows that might have unexpected values (e.g. "ADDRESS"
and "ZIP CODE").
You can now take a quick look at the data with:
df.head()
GX - Exploration and Building an Expectation Suite
GX Set-Up
With the dataframe, you can use Great Expectations for data exploration, and start to set up some initial tests. Below, you'll import GX, and set up and save your GX Data Context, which is like initializing your GX project. Then, you'll get a GX Validator, which will let you interact with your data using GX, and use it to write some initial Expectations:
import great_expectations as gx

# context_root_dir specifies where to save your GX configuration
context = gx.get_context(context_root_dir='./')

# pass the dataframe you created above into a GX Validator object
validator = context.sources.pandas_default.read_dataframe(df)

# confirm that the data were successfully passed to GX
validator.head()
In this example, we are using open source Great Expectations, and so
in your current directory, there is now a subdirectory called gx -
this is your GX project where your configuration and the tests you will
create will be saved. You could also use GX Cloud, in
which case your configuration would be hosted directly by Great Expectations.
Both GX OSS and GX Cloud will work with this tutorial.
Expectations
Once you have the Validator object, you can start to add some Expectations.
Expectations are like unit tests for your data: they take the form
expect_<something>. Examples include expect_column_values_to_not_be_null,
expect_column_max_to_be_between, and expect_table_columns_to_match_set.
Let's try one out:
validator.expect_column_values_to_not_be_null("address")

When you run this, you'll immediately see the results of your test in JSON
form. You'll see that "success": true which means that your test has passed
(and therefore there are no NULLs in that column).
Let's try out another:
validator.expect_column_values_to_be_between(
    "number_trees",
    min_value=1,
    max_value=10
)
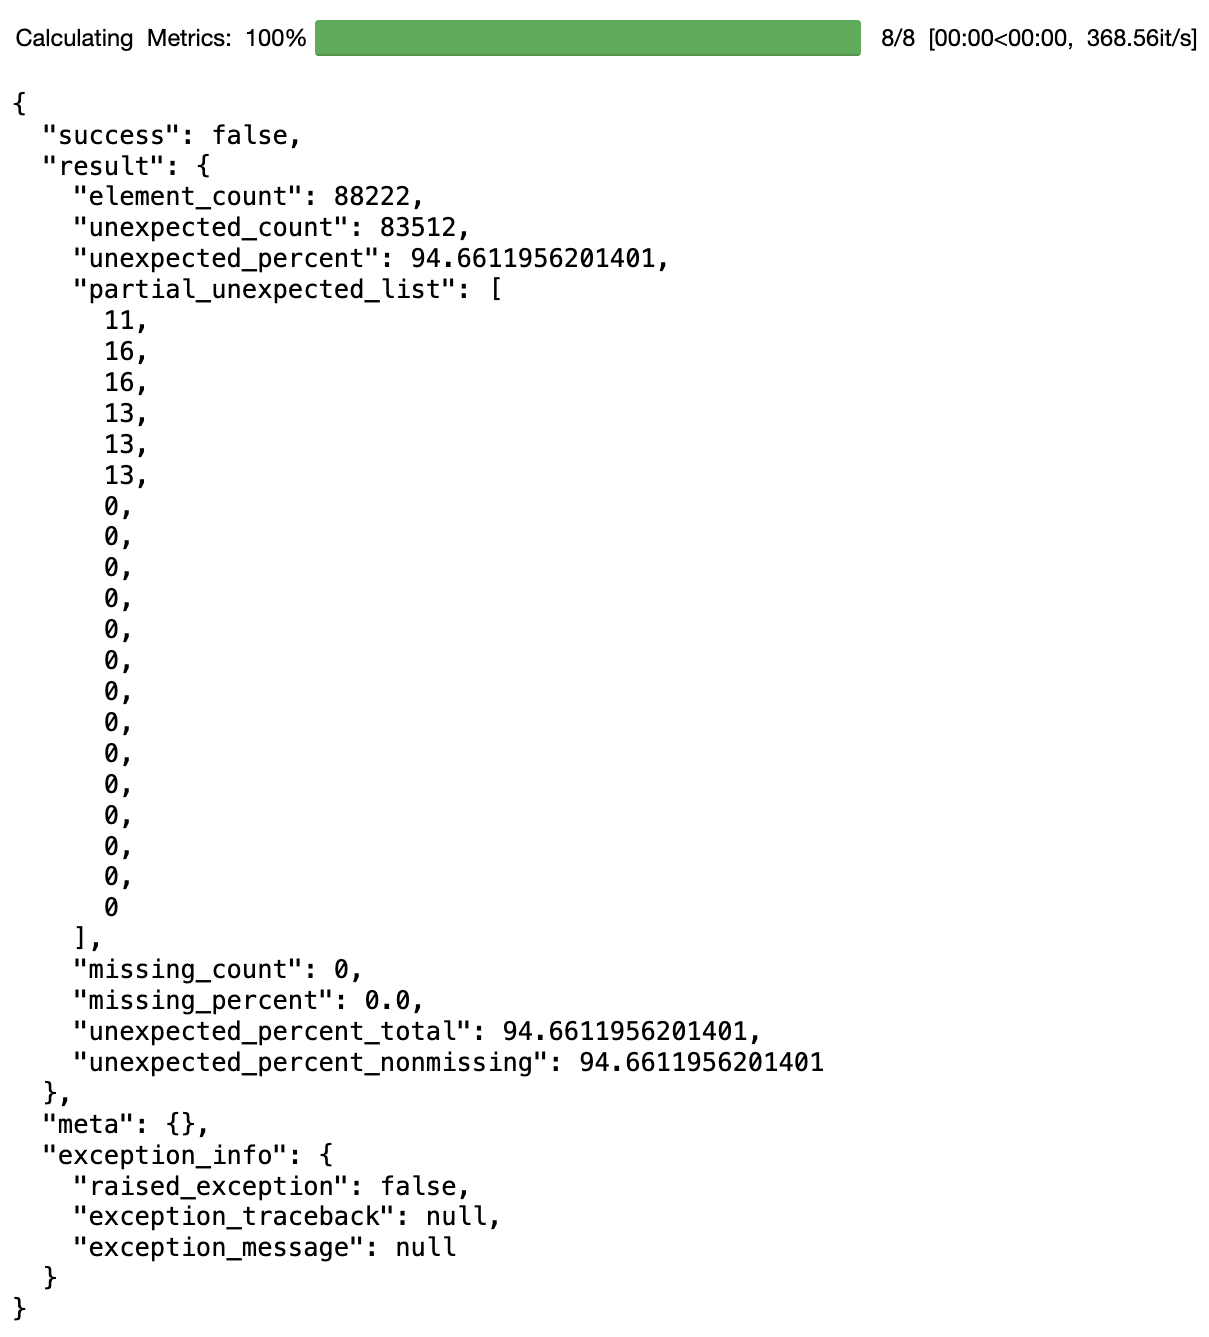
When you run this, you'll see that this test has failed: the JSON result will
show that "success": false, and also show the count and percentage of
unexpected values (values that fall out of the specified range), as well as
some examples of those values. In this case, it looks like our initial
assumption about both the min and max value for the number of trees was wrong.
Unfortunately, there are some buildings bought or sold that don't have any
trees, but on the bright side there are also some buildings with lots more
trees than we had initially guessed.
You can try running it again with updated values to overwrite the previous version of the Expectation you had written:
validator.expect_column_values_to_be_between(
    "number_trees",
    min_value=0,
    max_value=1500
)
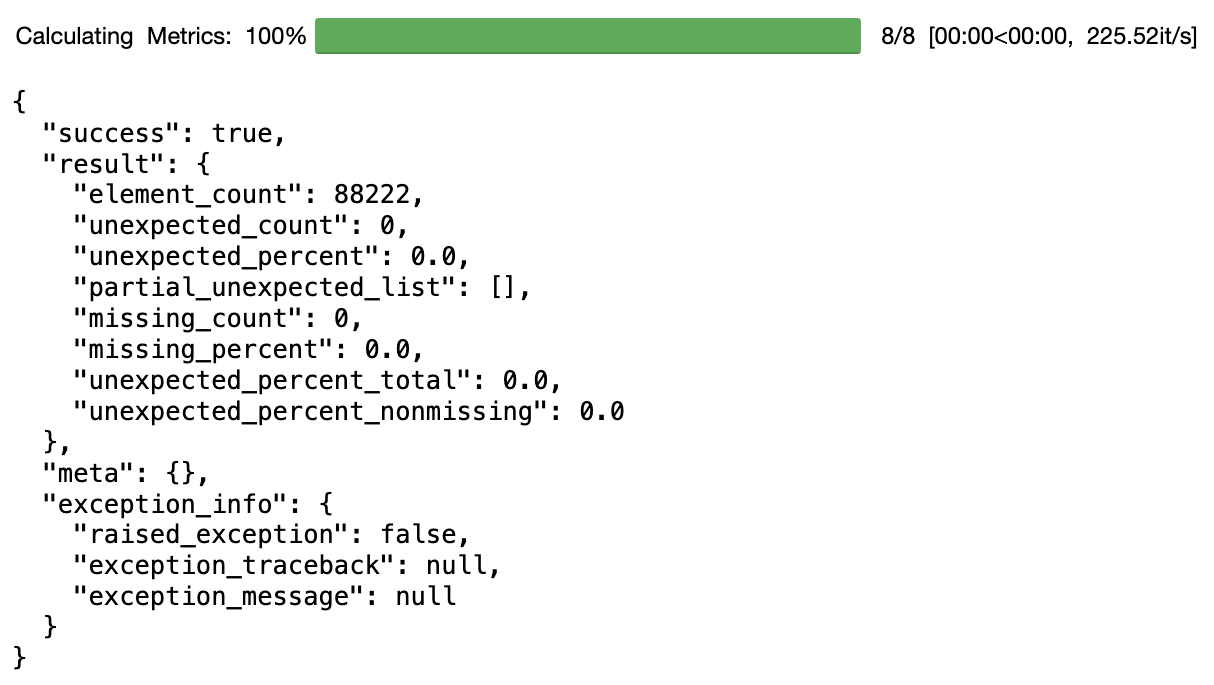
1500 is a LOT of trees! It looks like the max value in the dataset here is 1362. There are two possibilities here: either the data are wrong, and a mistake has been made somewhere, or our assumptions are wrong, and there are just some buildings that have a lot of trees. In this case, we'll assume that our assumptions are wrong, but it's nice to be made aware of this in case we needed to check that nothing had broken upstream somewhere.
You can see the full list of Expectations here. Once you
have a Validator object, you can also start to type validator.expect and the
full list of Expectations will pop up. Try adding some more Expectations and
see what happens!
Saving the Expectation Suite
So far, you've added at least two Expectations to your Expectation Suite - one that asserts that the "address" field should never be null, and one that asserts that the "number_of_trees" is between 0 and 1500. Now, you can save your Expectation Suite - this will enable you to re-run these tests in the future when new data have arrived.
# first, give the Expectation Suite a descriptive name
validator.expectation_suite_name = "nyc_tree_suite"

# second, save the Expectation Suite
validator.save_expectation_suite()
If you look in your gx/expectations directory, you will now see a file
called nyc_tree_suite.json - this is your Expectation Suite
Adding a Checkpoint to Run the Expectation Suite
Though we ran each individual Expectation as we added them to our Expectation Suite, we will still want to run the entire Expectation Suite at once, for instance, when we get new data. To do that, we will add something called a Checkpoint.
A Checkpoint is a GX construct that lets you run an Expectation Suite and quickly understand what has passed or failed. Once you have a Checkpoint, you can run it whenever a new batch of data comes in, or you can add it to a data pipeline to automate the testing of new data.
To add a Checkpoint, you can run:
checkpoint = context.add_or_update_checkpoint(
    name="tree_suite_checkpoint",
    validator=validator,
)
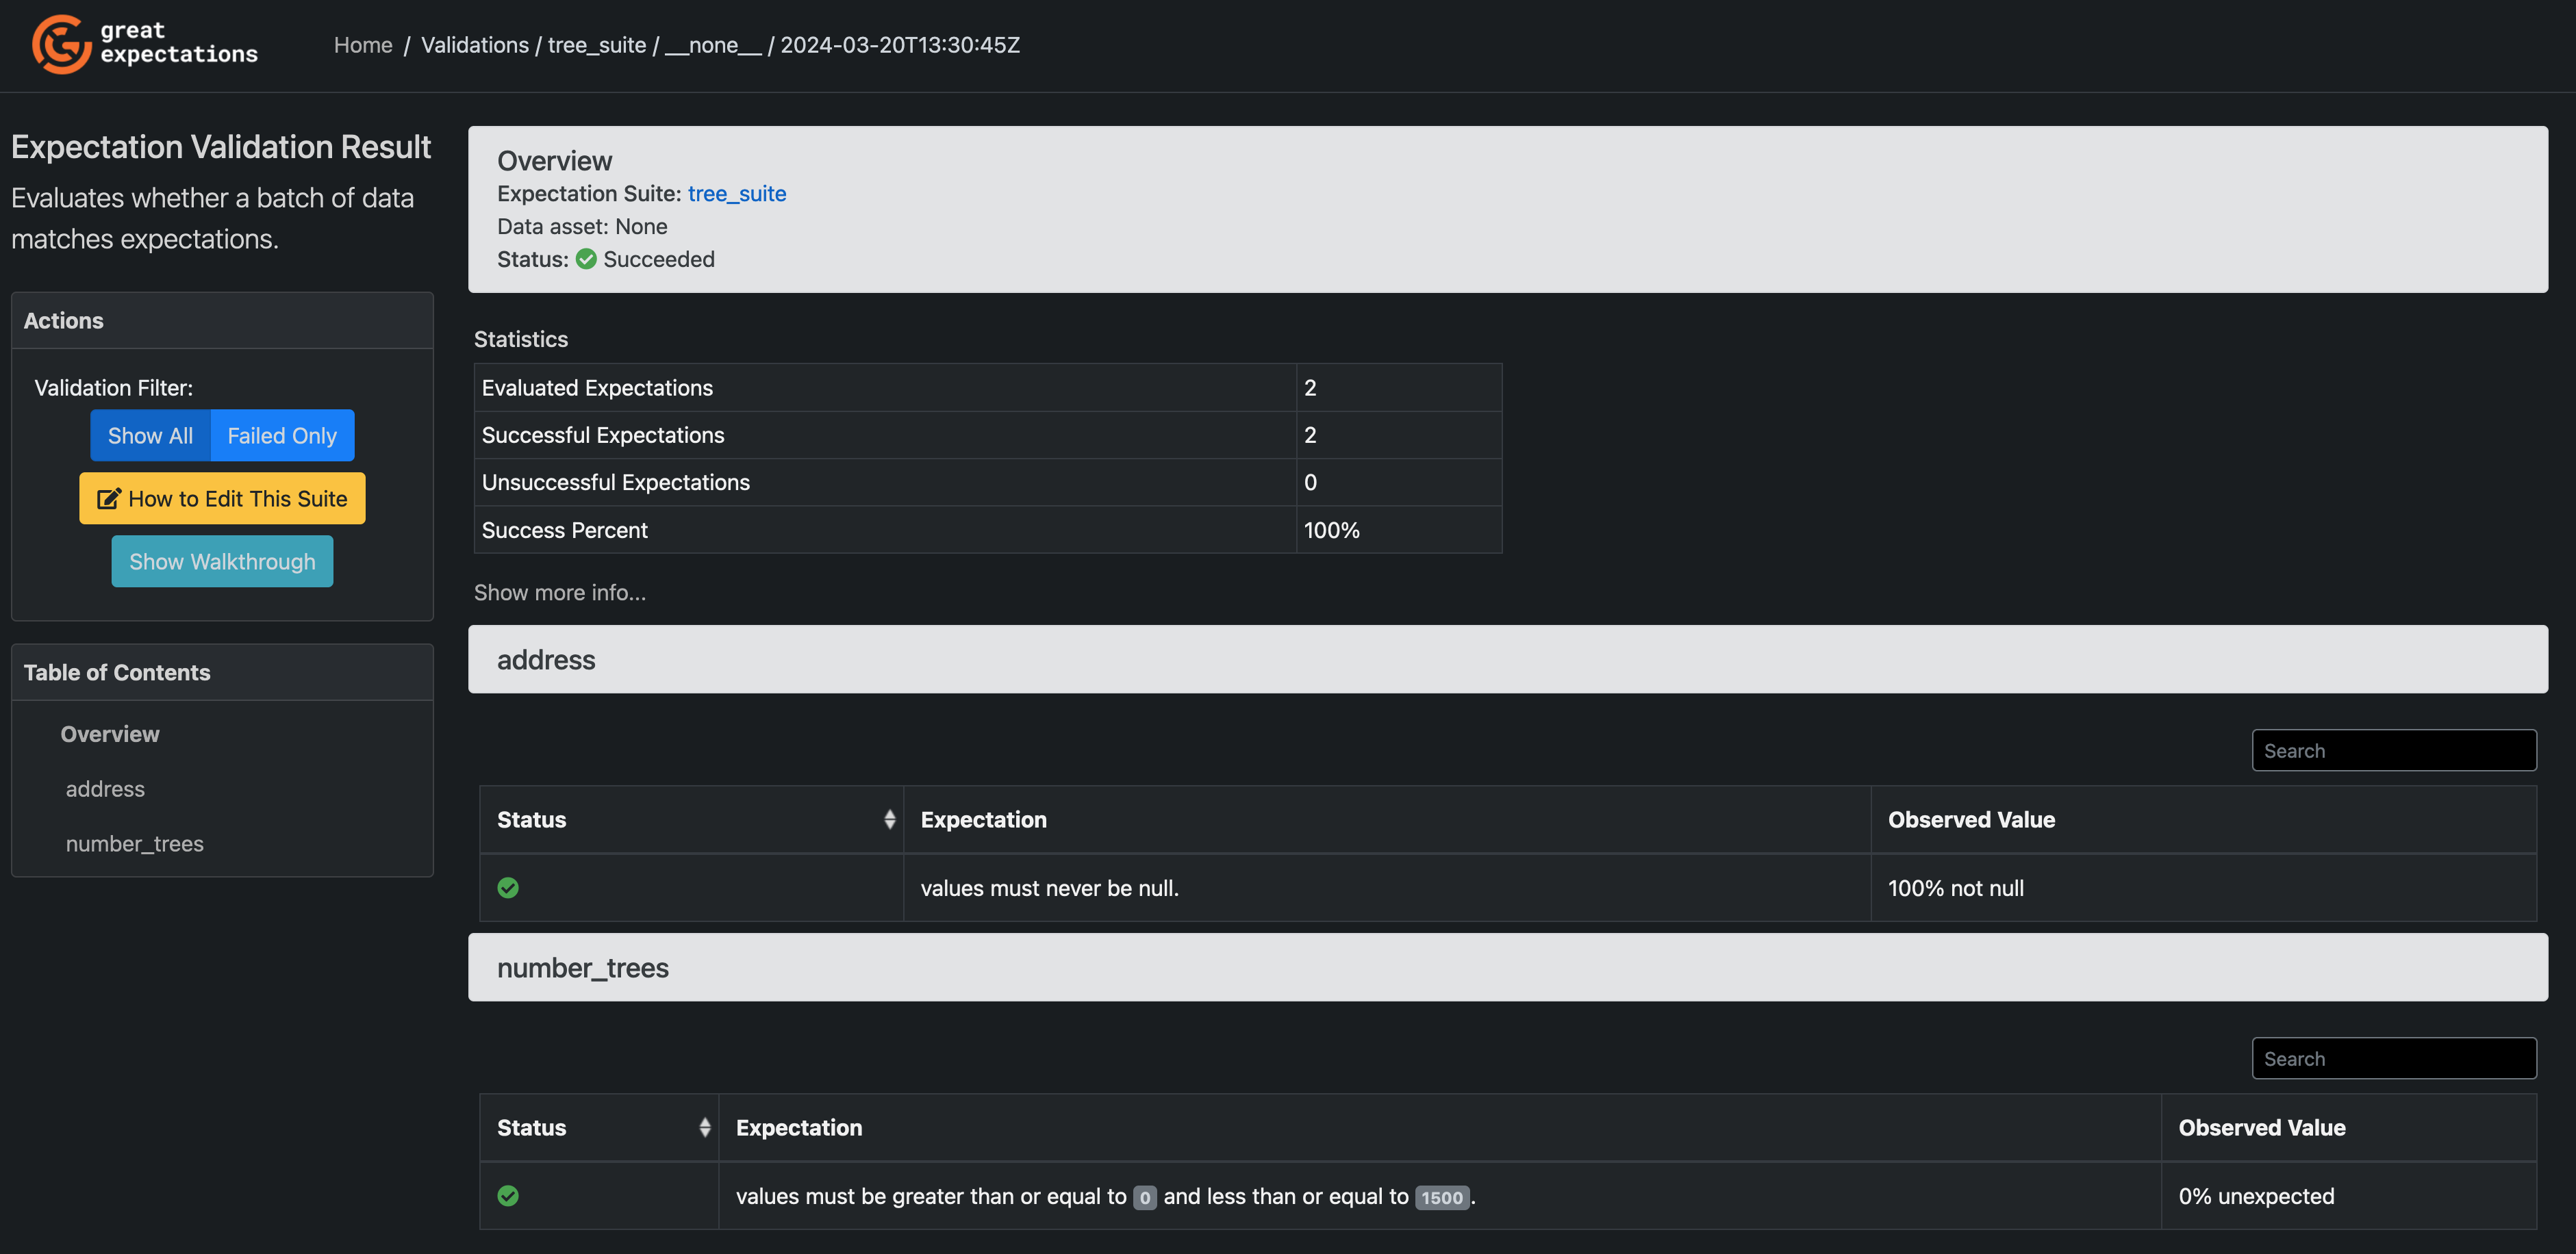
Then you can run your Checkpoint and view the rendered results of your Checkpoint with:
checkpoint_result = checkpoint.run()

context.view_validation_result(checkpoint_result)
When you call view_validation_result, a new window will open in your browser
with the rendered HTML of your Checkpoint run - this will tell you which
Expectations passed, and which failed.
GX - Validating that against new data
New sales data has come in - we've gotten a collection of Parquet files
containing sales data for the year 2020. It would make sense to load this into
the existing GlareDB nyc_sales table; however, before doing that, it would
be good to run some tests to confirm that the data meet our Expectations.
Luckily, you've just created those tests! Here's how you can run them against the new data.
Creating a Pandas Dataframe with the New Data
First, you can create a Pandas dataframe from the new data. You can use almost
the exact same query as before, just changing the initial FROM to select from
the NYC sales Parquet files from 2020, instead of from the GlareDB table.
df = con.sql(
    """
        SELECT nyc_sales."BIN" bin,
                nyc_sales."ADDRESS" address,
                nyc_sales."ZIP CODE" zip_code,
                nyc_sales."SALE DATE" sale_date,
                nyc_sales."SALE PRICE" sale_price,
                COUNT (distinct tree.spc_latin) number_tree_species,
                COUNT (tree.spc_latin) number_trees
        FROM
        '../nyc_sales/SALE_YEAR_2020/**/*.parquet' nyc_sales
        LEFT JOIN snowflake_sandbox.public.nyc_tree_data tree
        ON nyc_sales."BIN" = tree.bin
        GROUP BY nyc_sales."BIN",
                nyc_sales."ADDRESS",
                nyc_sales."ZIP CODE",
                nyc_sales."SALE DATE",
                nyc_sales."SALE PRICE"
    """).to_pandas()

df.head()
Once you have the dataframe, you can re-initialize your GX Validator object:
validator = context.sources.pandas_default.read_dataframe(df)

validator.head()
Then, retrieve the saved Checkpoint, re-run it, and view the validation results:
checkpoint = context.get_checkpoint("tree_suite_checkpoint")

checkpoint_result = checkpoint.run()

context.view_validation_result(checkpoint_result)
This time, you'll notice that the Expectation Suite has failed - the max number of trees is even higher!

Again, you face the question - were the data wrong, or
just the assumptions about the data? Again, we'll go with the explanation that
it was the assumptions that were wrong, which means the data are all set to
add to the nyc_sales table.
Given that, you can now load the data into your table with:
con.execute(
    """
        INSERT INTO nyc_sales
        SELECT * FROM '../nyc_parquet/SALE_YEAR_2020/**/*.parquet'
    """
)
Once you've done that, you can update your Expectation Suite to reflect your new understanding of the data:
validator.expect_column_values_to_be_between(
    "number_trees",
    min_value=0,
    max_value=1700)

validator.save_expectation_suite()
Now, you're all set to validate the next batch of data that comes in!
Conclusion
With just a handful of lines of code, you were able to join data between GlareDB, Parquet files, and Snowflake, do some data exploration, add some data tests, and run those tests on new data!
In the coming weeks we'll show some other ways that you can integrate GlareDB with other data tools, like dbt. If there's something specific you'd like to see, please set up a chat or email us as hello@glaredb.com.